Webex is a video conferencing application, with softphone and screen sharing functionality. Below some of the most commonly used features.
If you need information about Webex softphone please click here.
Joining a Meeting
There are two options for how to join a Webex meeting: inputting a meeting code or opening link in the email.
1 – In the Webex application click the calendar icon on the left panel.
2 – Then click the “Join the Meeting” icon.
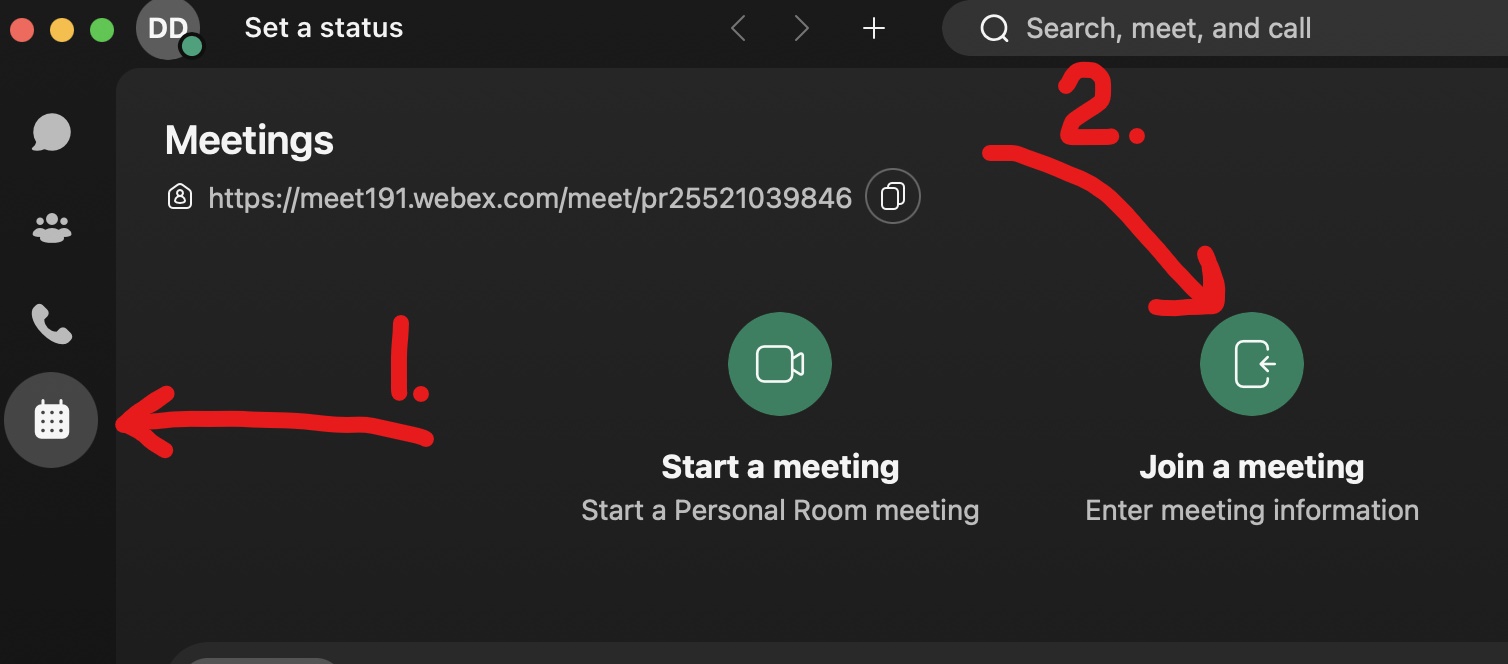
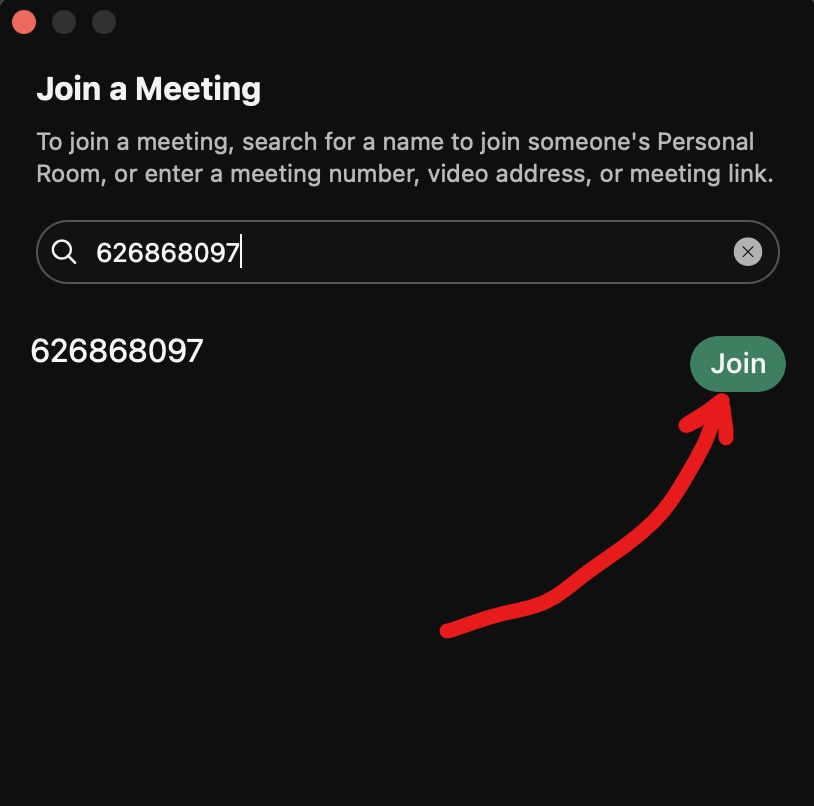
3 – Ask the host for the meeting code and input it in the window. Then press “join” (Note: your meeting code will differ from the one shown in the example below).
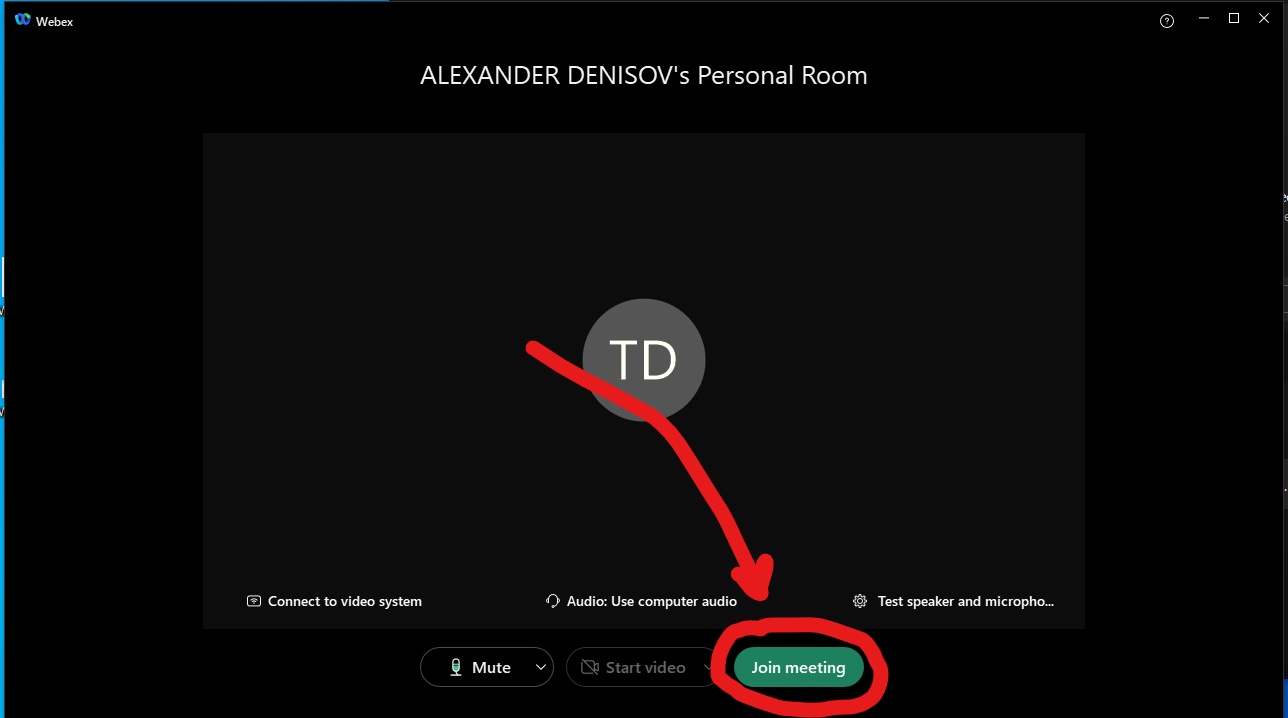
4 – Click the “Join meeting” button in the bottom right corner.
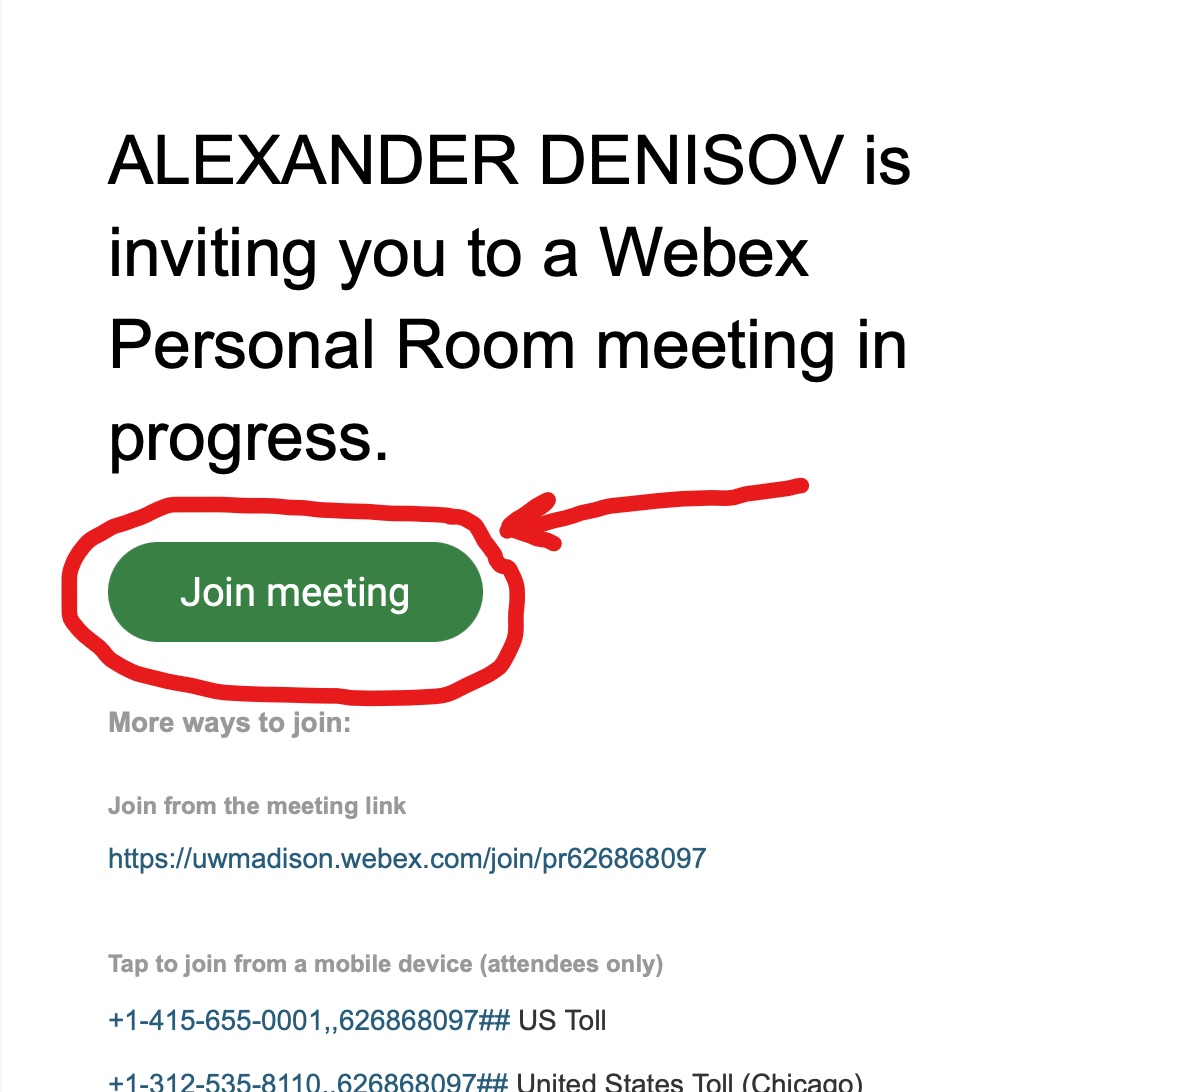
1 – The invitation email will have a big green “Join Meeting” button. Click it.
2 – In the new tab click “Open Webex” to open the Webex application.

3 – When Webex opens, click the “Join meeting” button in the bottom right corner.
1 – The invitation email will have a big green “Join Meeting” button. Click it.
2 – In the new tab click “Allow” to open the Webex application.
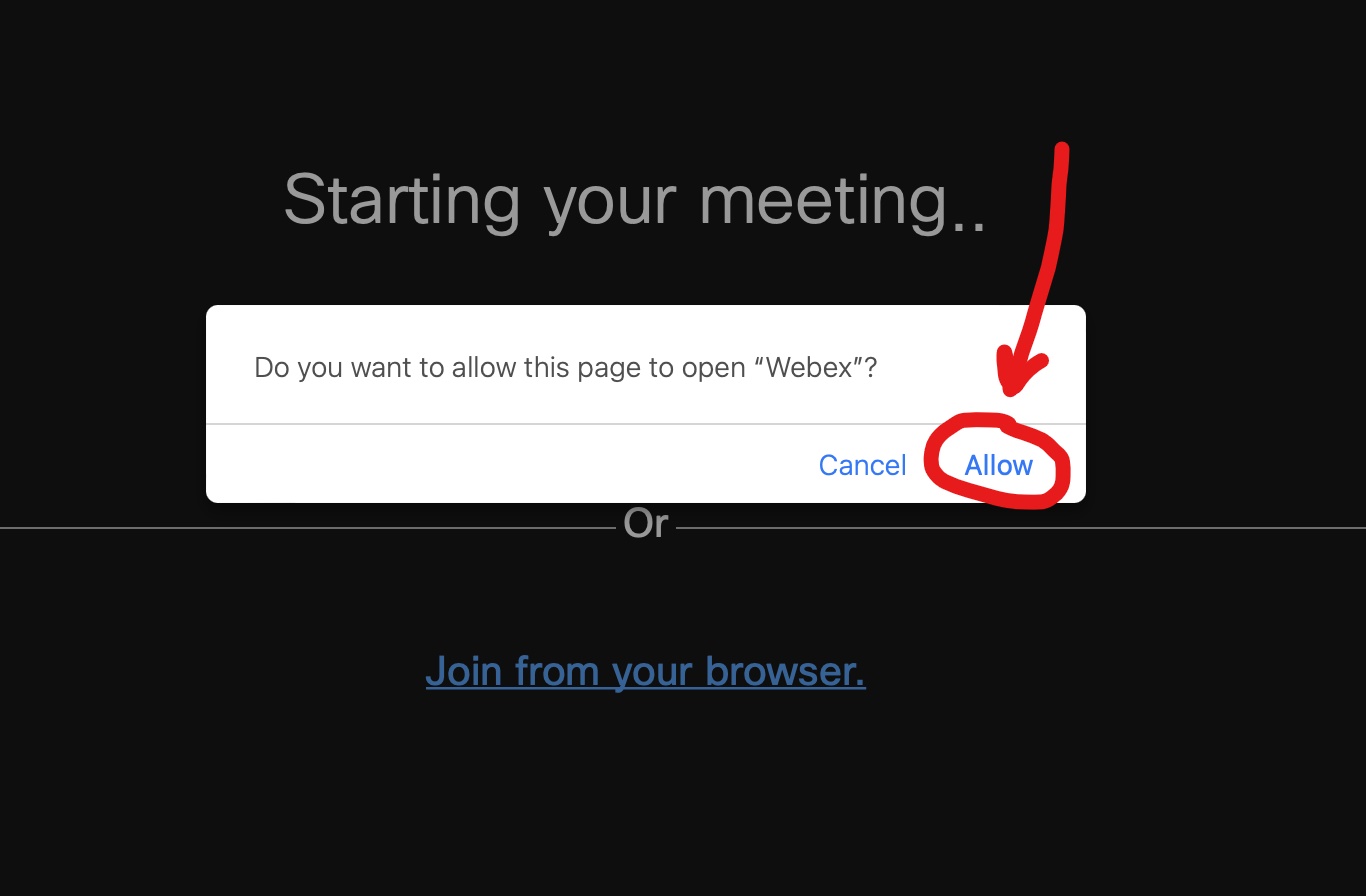
3 – When Webex opens, click the “Join meeting” button in the bottom right corner.
Sharing Screen or Content
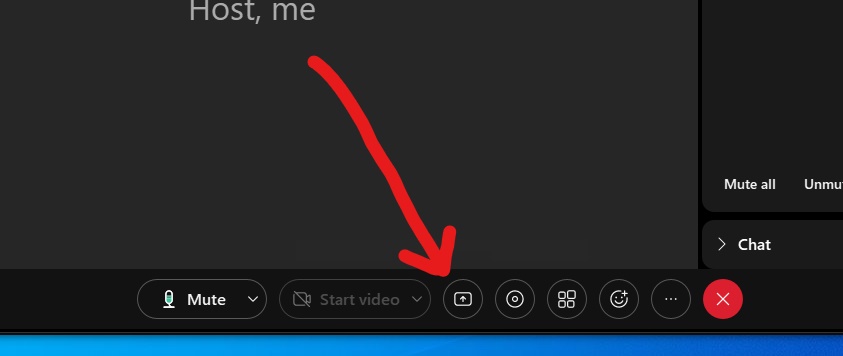
1 – To start screen sharing when in a Webex meeting click the “Share content” button on the bottom panel.
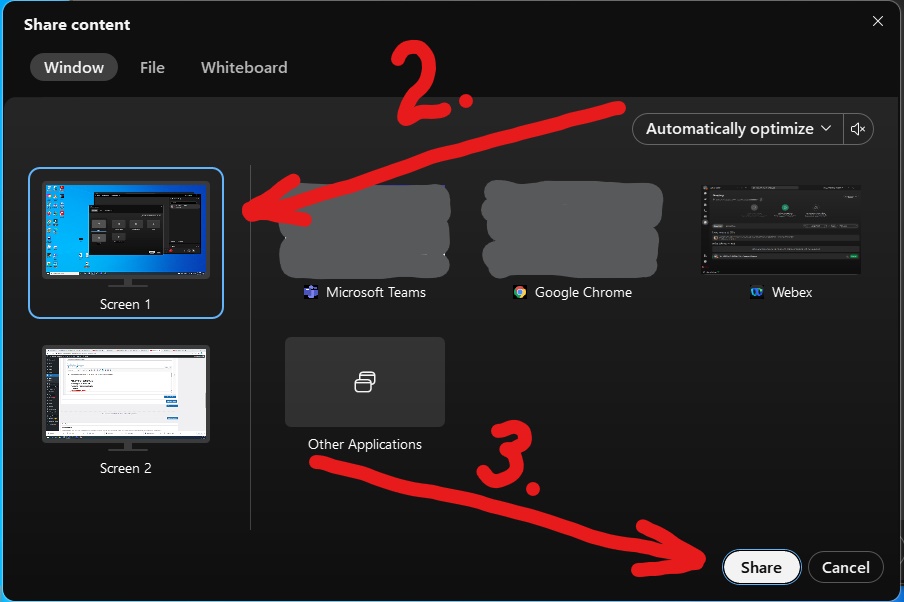
2 – In the appeared window select “Screen 1” option in the top left corner.
3 – Then click the “Share” button in the bottom right corner.
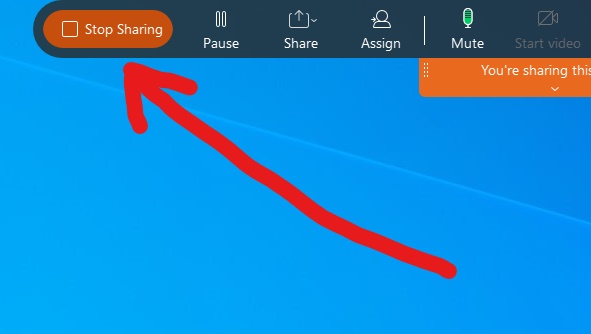
4 – To finish the screen sharing session click the orange “Stop Sharing” button on the top panel.
Note on Screen Sharing for Mac Users
Macs do not allow applications screen sharing capabilities by default. If above steps do not work for you, then you have to do the following:
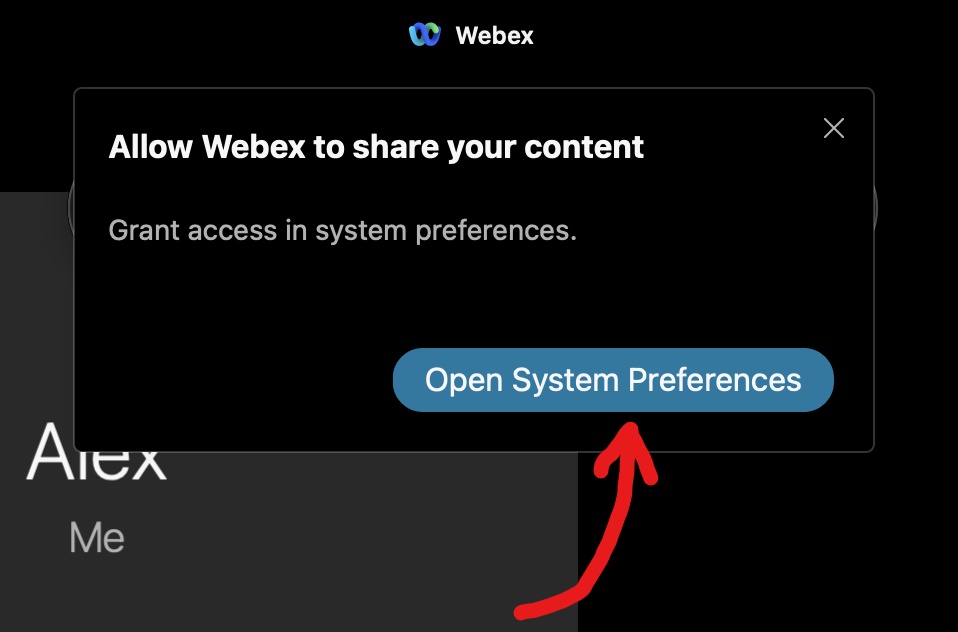
1 – When pressing the screen sharing button message below appears. Click the “Open System Preferences” button.
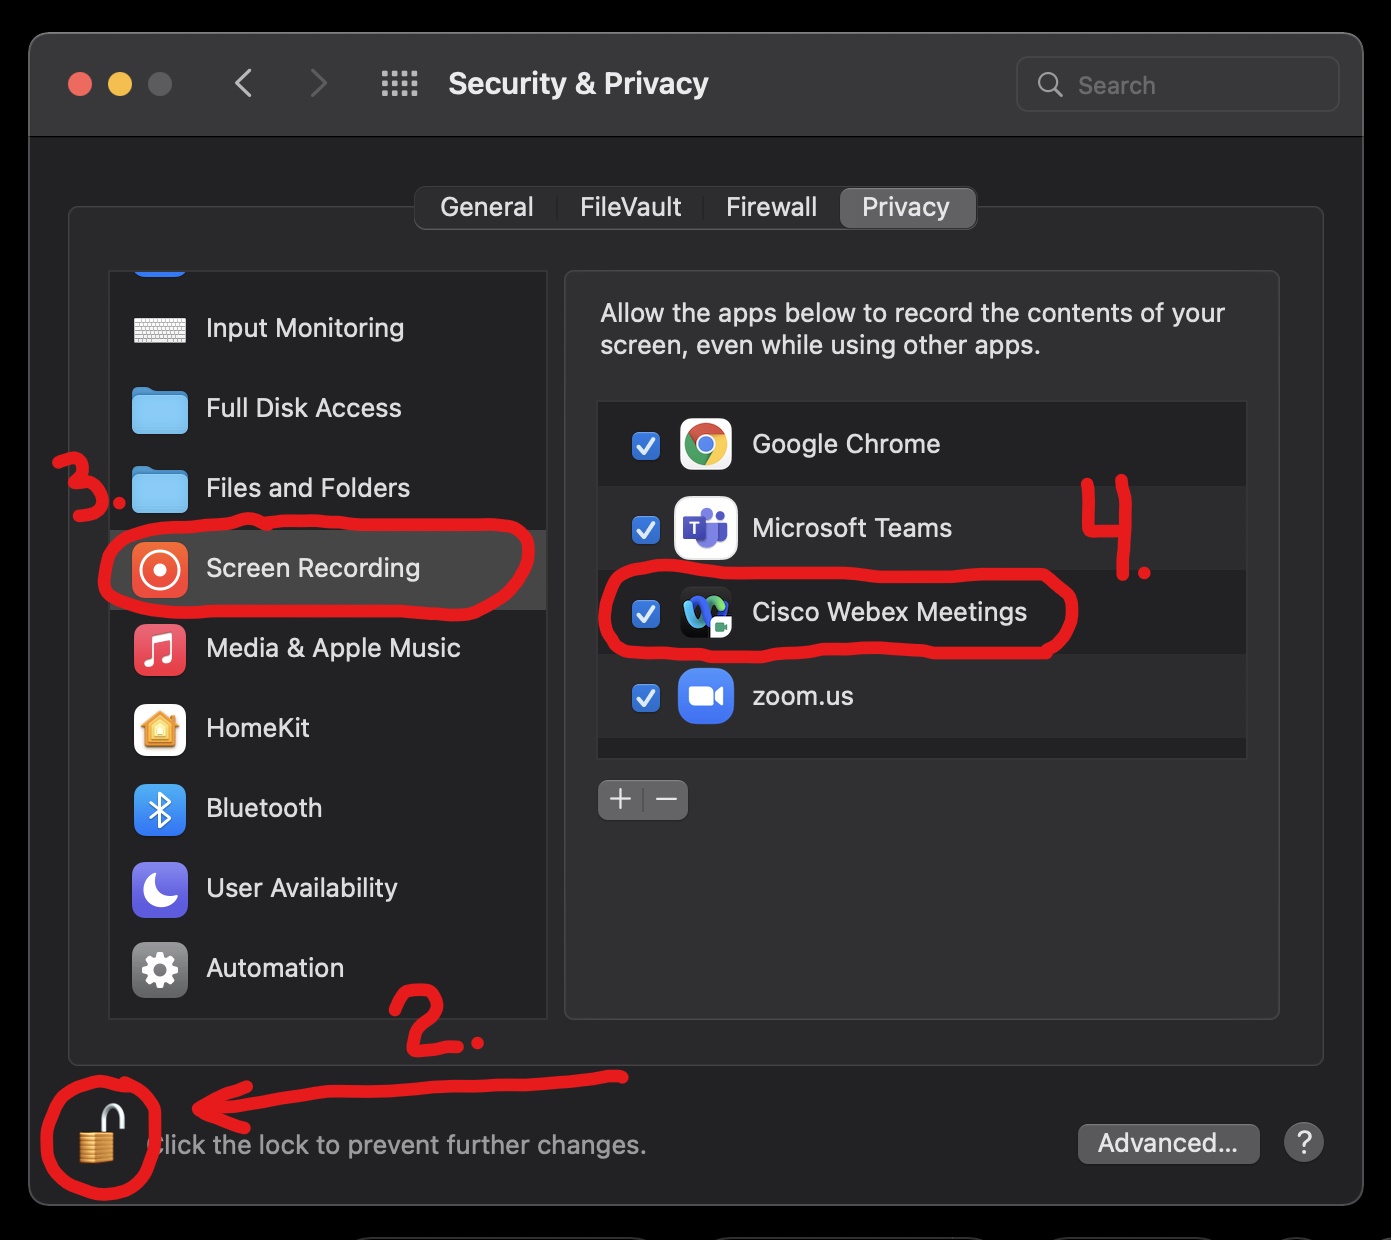
2 – In the Security & Privacy settings click the lock in the bottom left corner. You will be prompted to input your Mac password.
3 – In the left panel scroll to “Screen Sharing” and select it.
4 – Select the checkbox next to the Webex app to allow it to record your screen.
5 – Now when you close and reopen Webex application you will be able to share your screen.
Hosting a Meeting
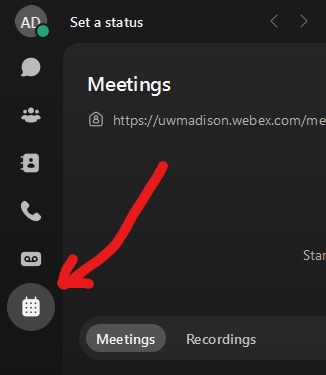
1 – Click the calendar icon at the bottom of the left panel
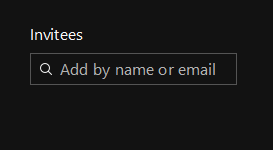
2 – If you want to schedule a meeting in the future, then click the right-most “Schedule a meeting” icon. In the appeared window you can add emails of people who you want to receive invitations.
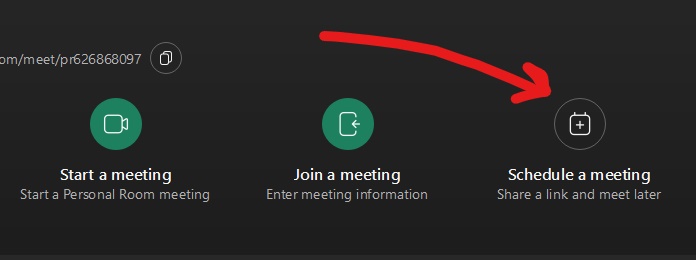
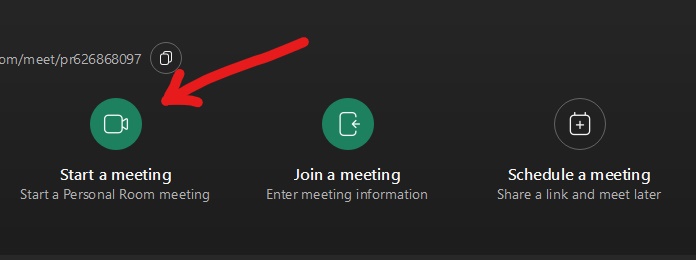
3 – If you want to start a meeting immediately, then click the left-most green “Start a meeting” icon.
4 – To invite people to your meeting click the “Meeting info” button on the top panel.

5 – Now you can send the meeting number (yellow) or meeting link (red) to anyone who you want to invite. Also you can use the built in invite tool (green) which will send invitations to emails that you specify. (NOTE: your meeting number and meting link will be different from the one shown below)

Use a Host Key to Claim the Host Role
When creating a Webex meeting, it is possible to generate a numerical 6-digit Host Key that can be shared with other meeting participants in order to allow them to promote themselves to the host role.
A participant can use the host key when the meeting becomes open for guests to join, which is 5 minutes prior to the start time by default (though this can be adjusted up to 15 minutes before the meeting start time in the meeting configuration settings).
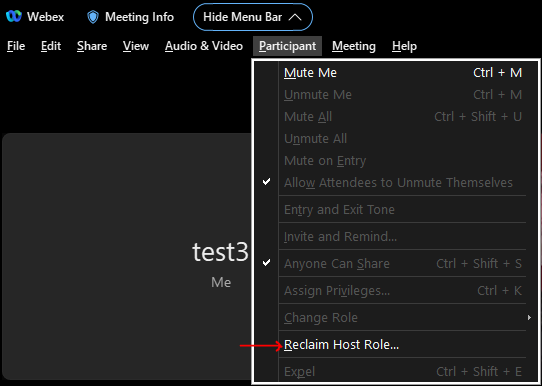
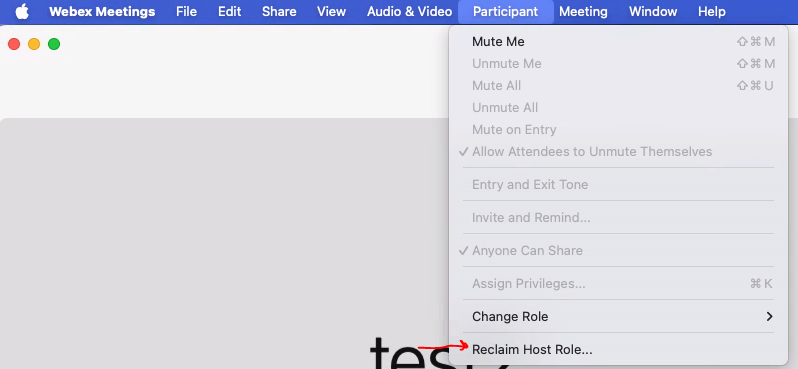
1. Expand the Menu Bar at the top of the screen, select Participant then select Reclaim Host Role
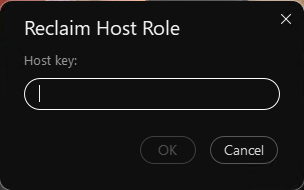
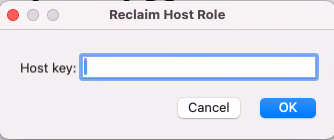
2. Enter the 6-digit numerical Host Key
1. From the Menu Bar at the top of the screen, select Participant then select Reclaim Host Role
2. Enter the 6-digit numerical Host Key
Recording a Meeting
Start Recording
1 – Click the recorder button on the bottom panel and then the red “Record” button.

2 – To pause or end the recording click the recorder button again.
3 – The recording will be emailed to you after the meeting is over. Note that it might take some time, depending on the length of it.
View Recordings
Web Browser
- Log into https://uwmadison.webex.com with your @wisc.edu email address
- Open Recordings in the left-hand menu
- See Cisco’s documentation for more details
Webex App
- Log into the Webex app on your computer with your @wisc.edu email address
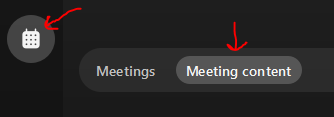
- Navigate to the Meetings tab in the left-hand menu, then select Meeting content to view recordings
- See Cisco’s documentation for more details.
Commons (Room 1616) Instructions
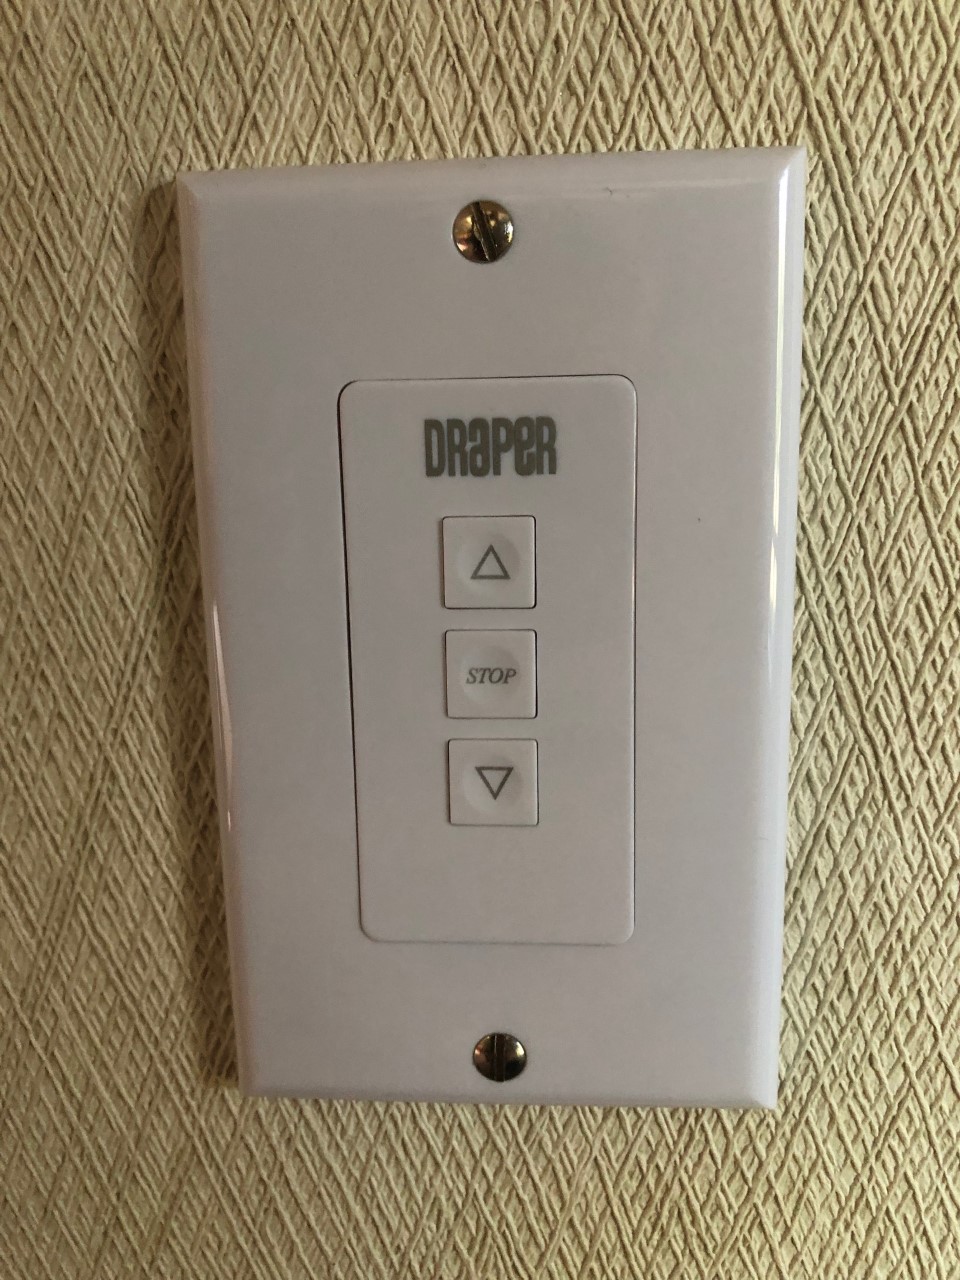
- Lower the Projector Screen with the Control Panel on the Wall
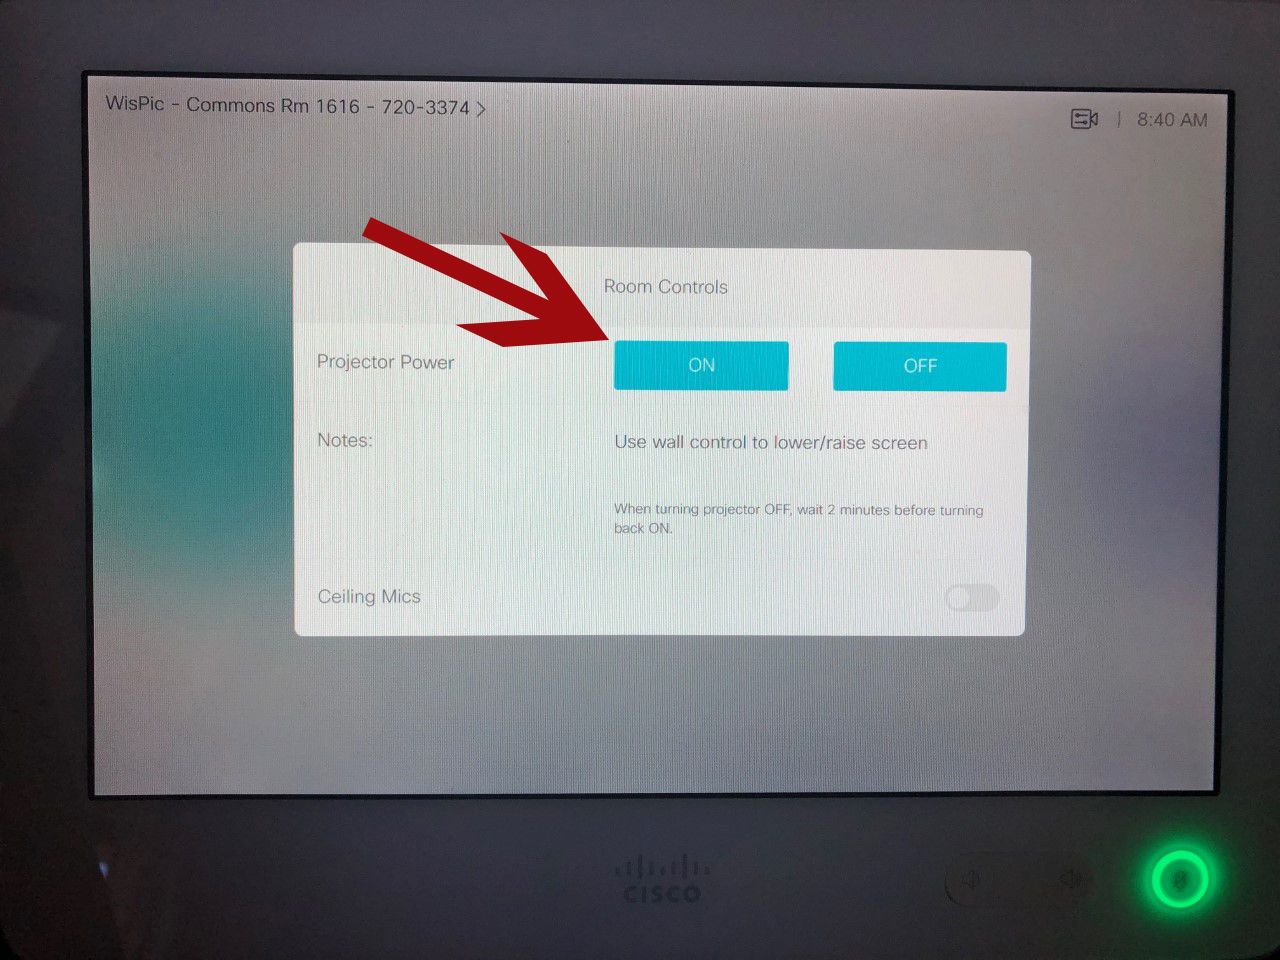
- On the Cisco Interface on the podium, click Room Controls
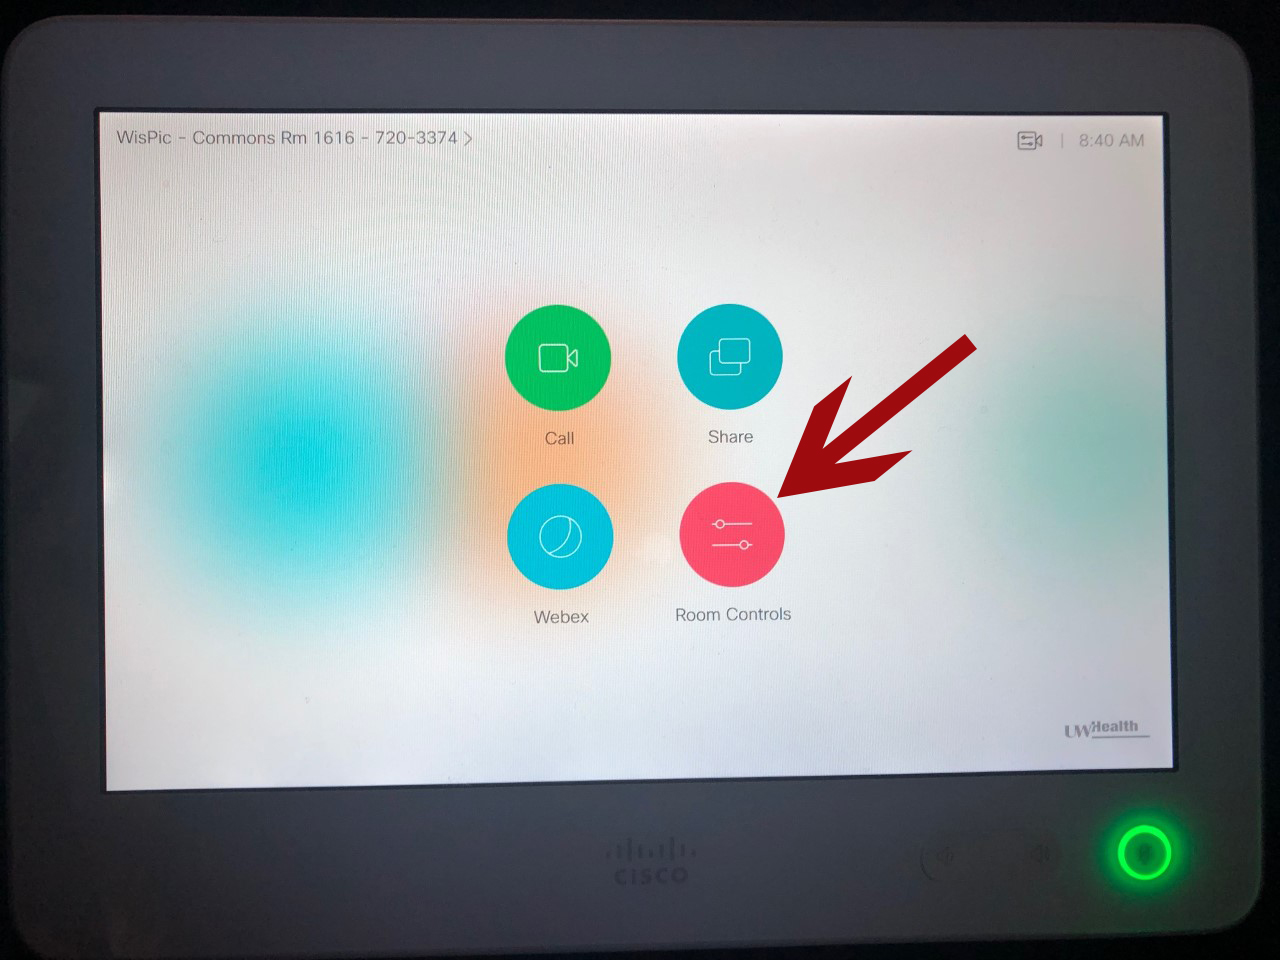
- Select ON from Project Power
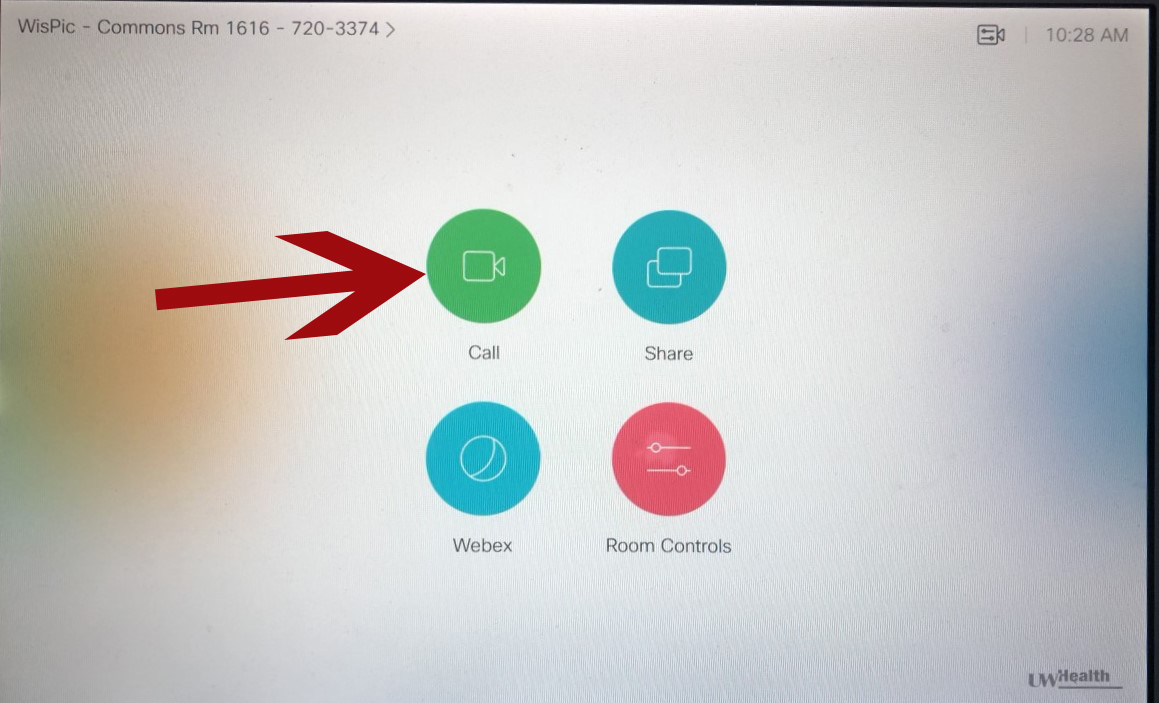
- Navigate back to the home screen, select Call
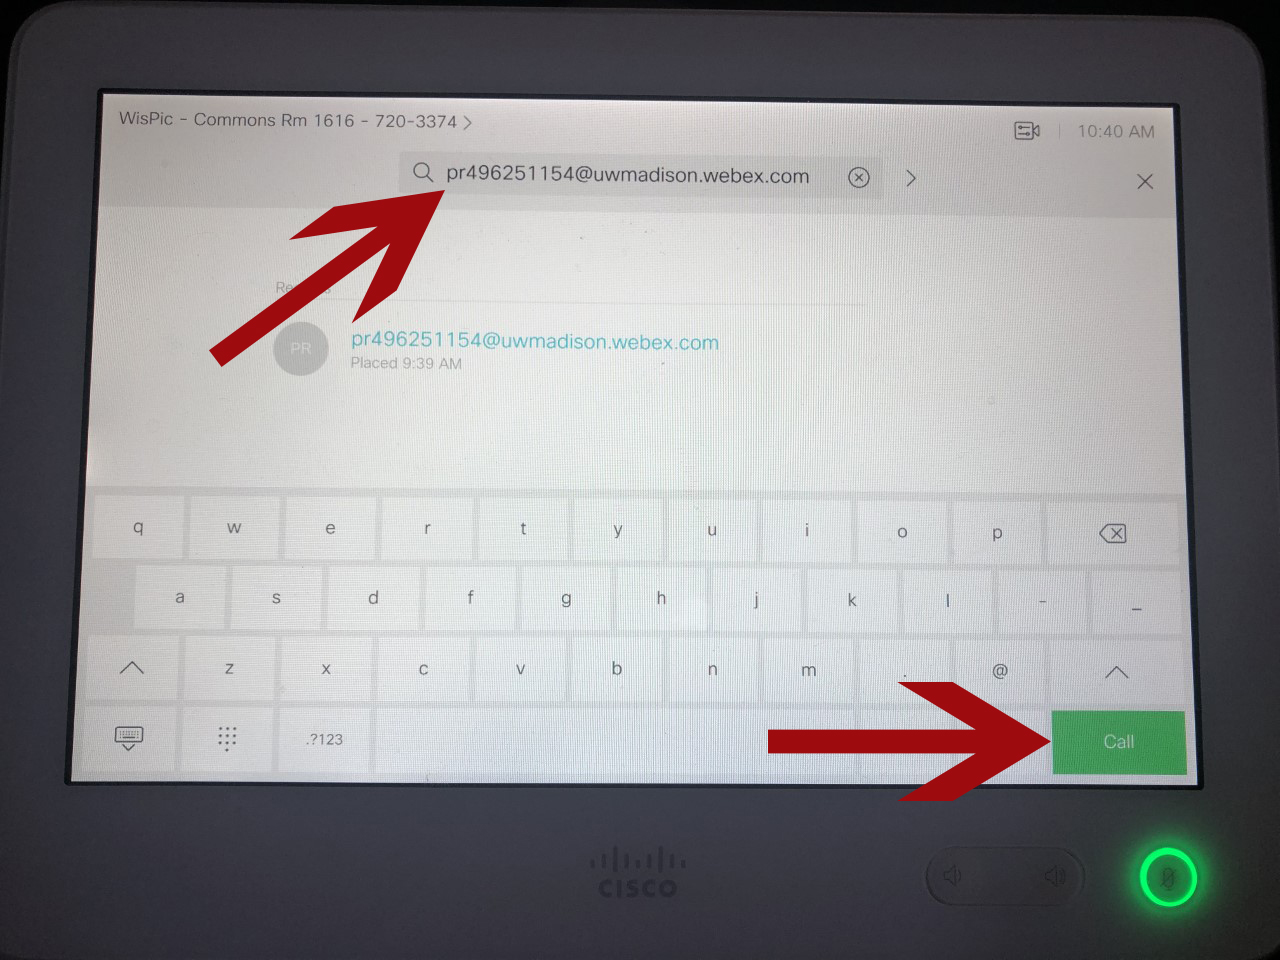
- Tap on the Search or Dial bar
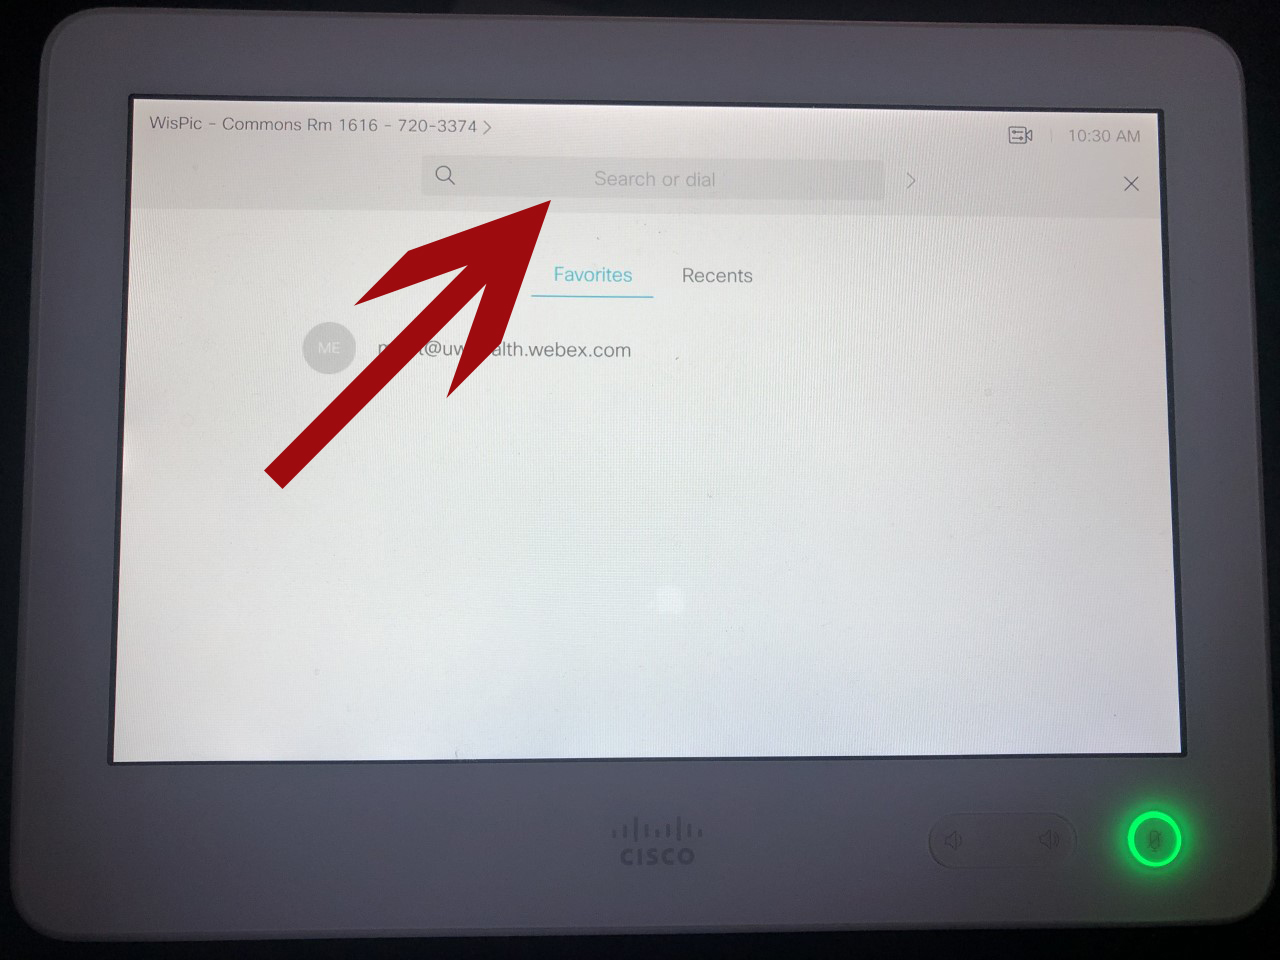
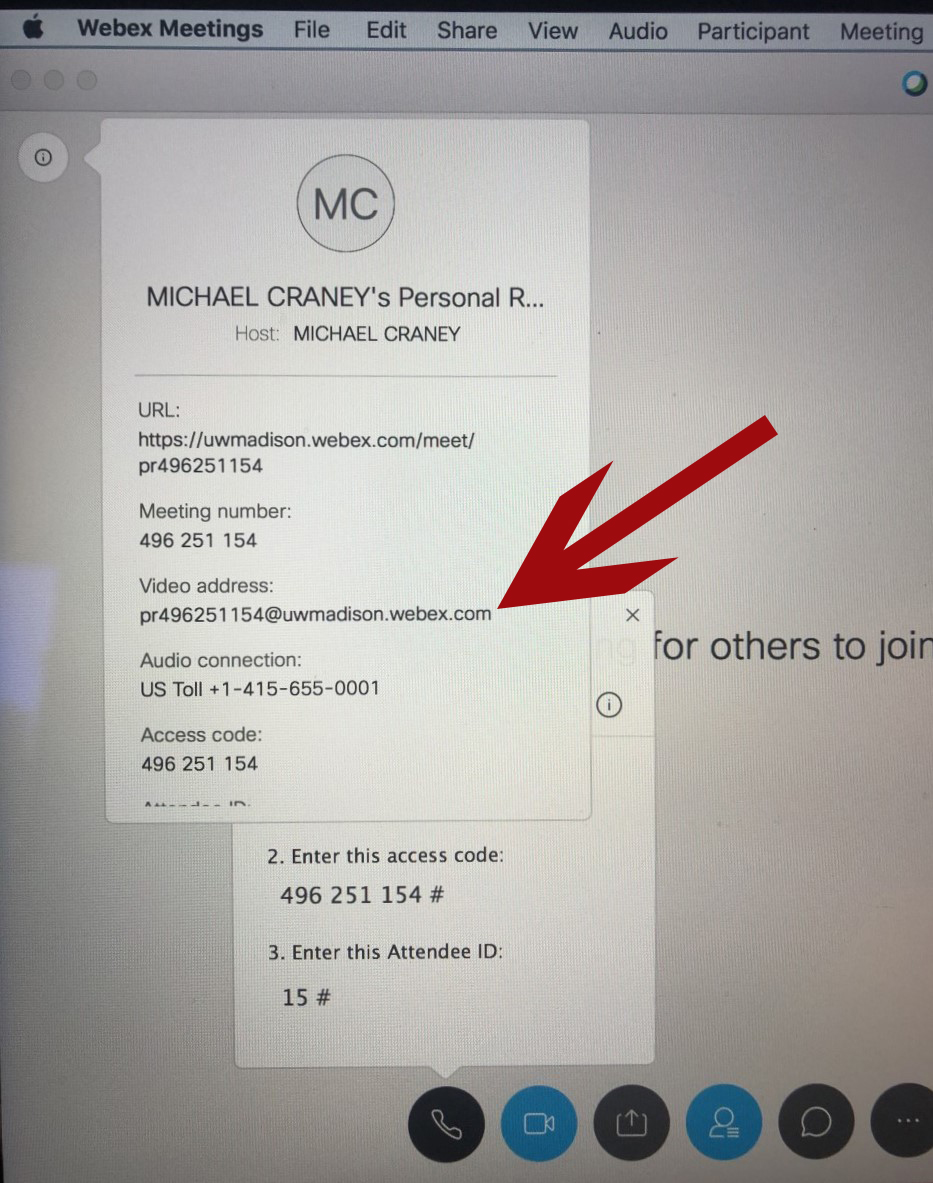
- Locate the Video Address for your meeting, this can be found on the host email message or through the information button on the Webex client. It should be along the lines of something@uwmadison.webex.com
- Enter the full Video Address in the Search or Dial bar and click Call
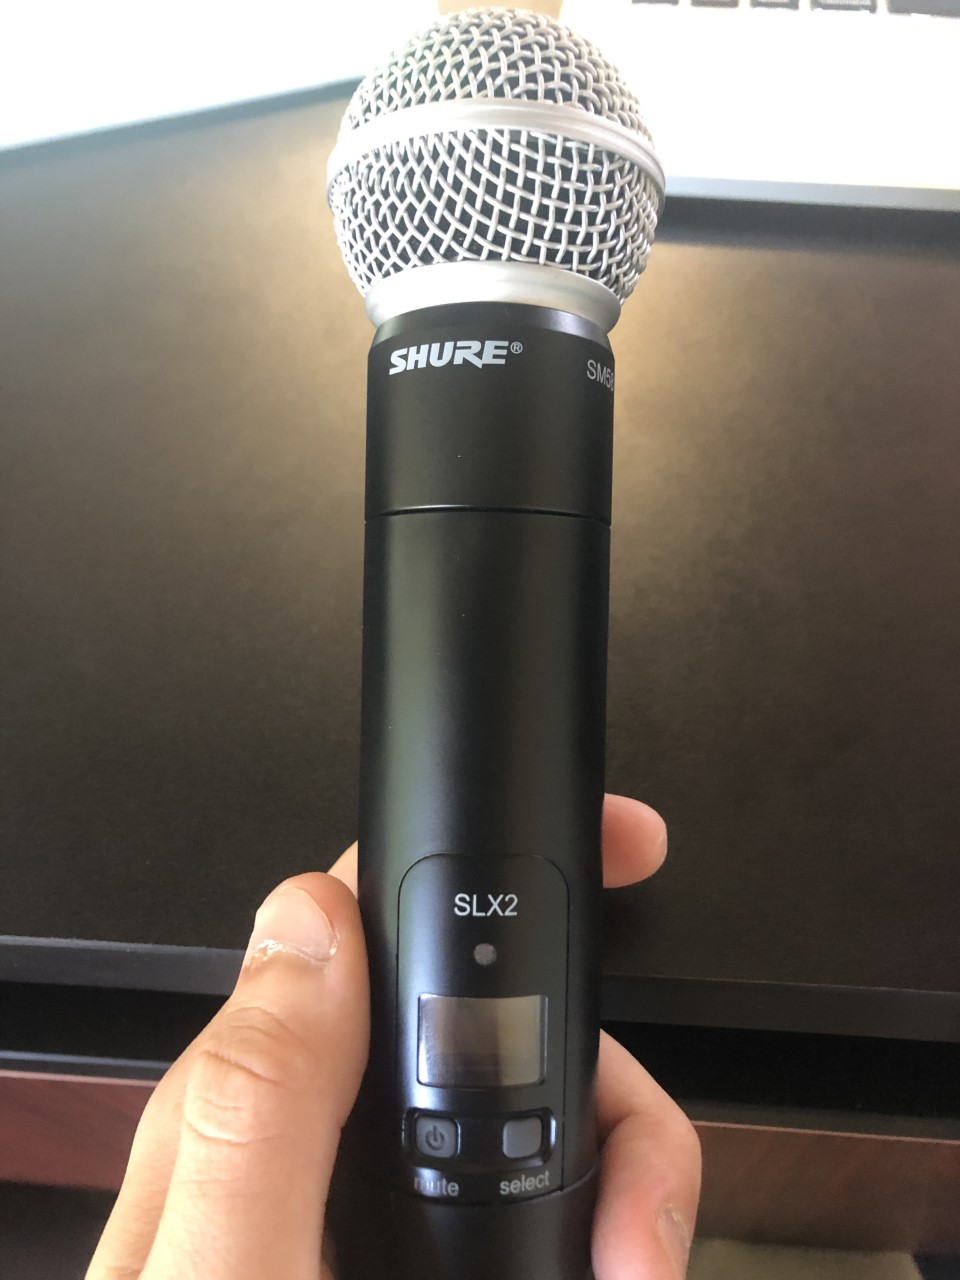
- Power on the Microphone by holding the power button (Please be sure to power it back off when you are finished)
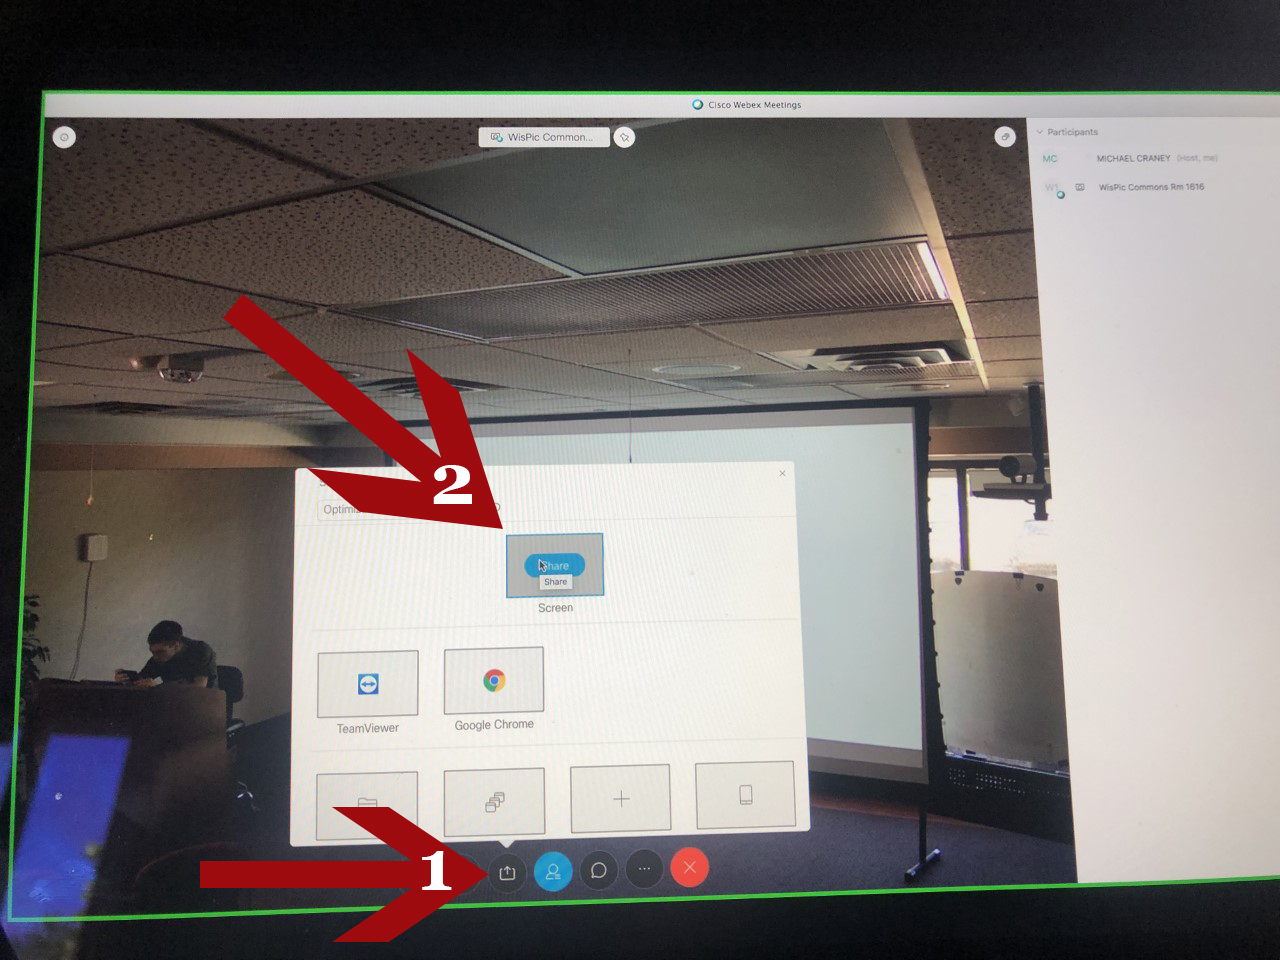
- If you are presenting slides, open them up on your computer and select the Share button on the bottom of the Cisco Webex Application, then select share on the screens tab
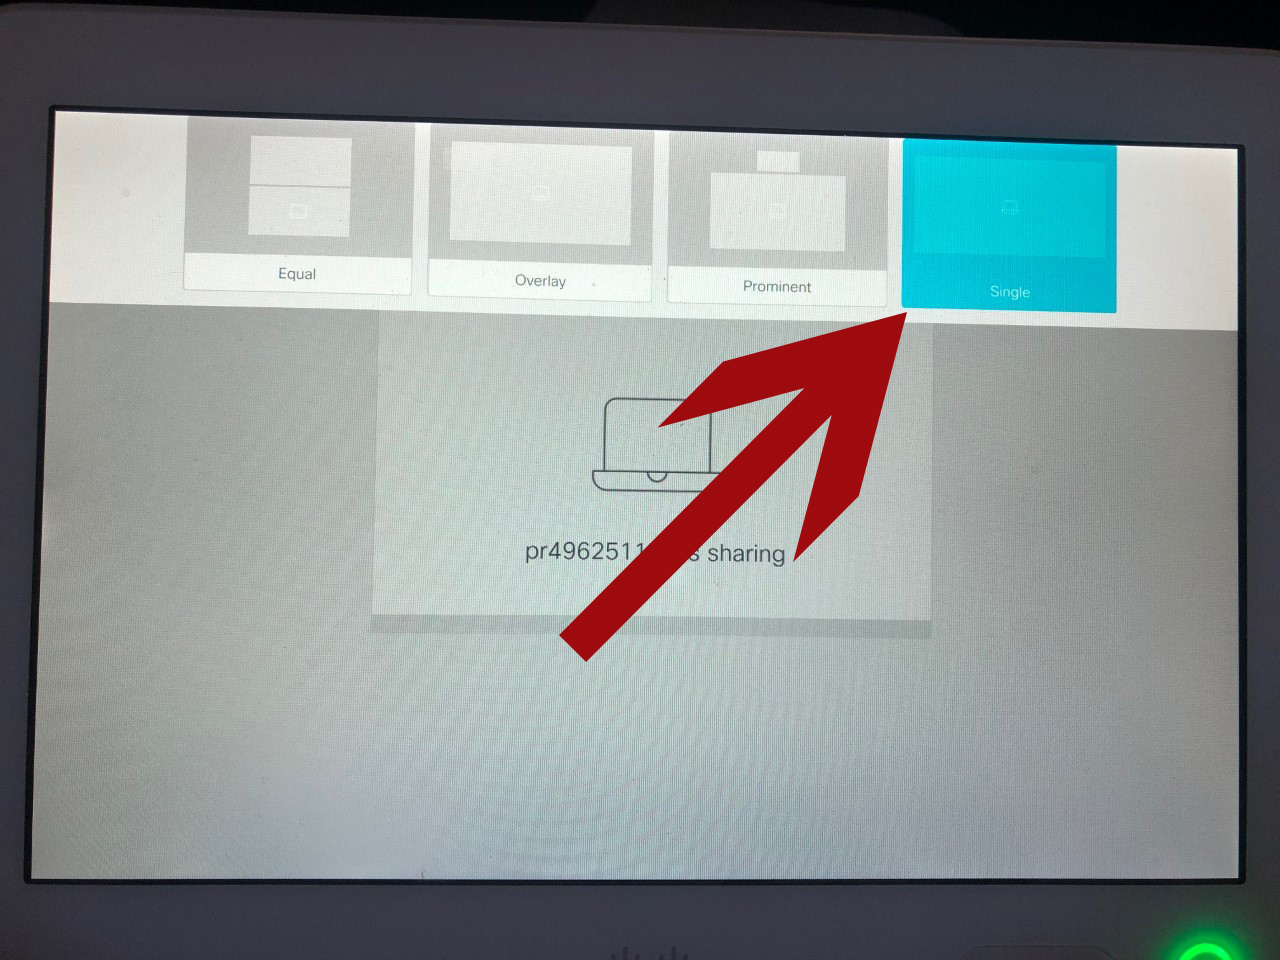
- On the Cisco Webex Interface, select the Screen Modification tab on the top right
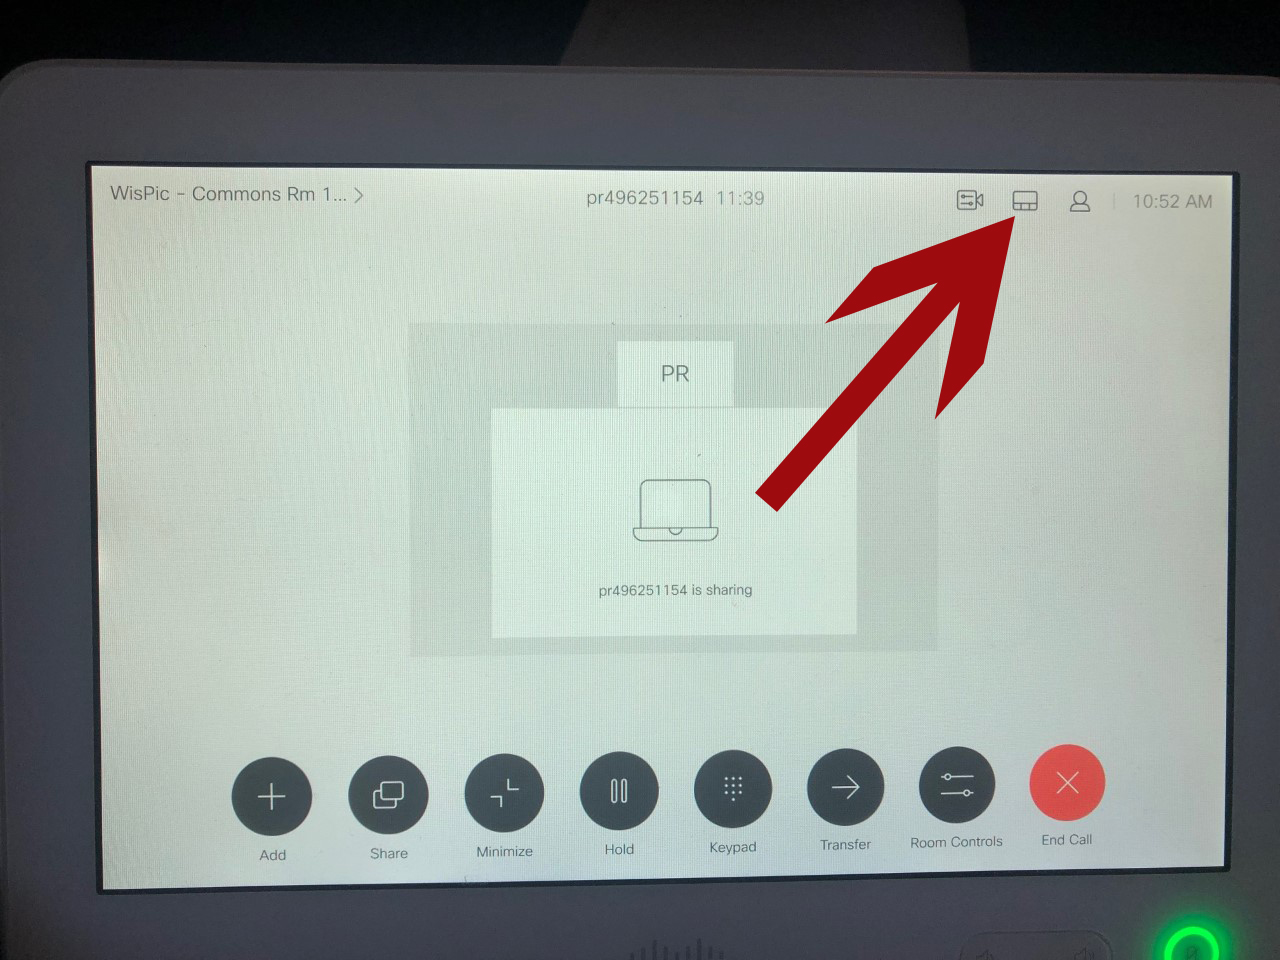
- Select Single
Your meeting should be set-up, but if you’re having any difficulties feel free to contact the help desk staff. If you’d like to add video feed of you talking on the podium, read below.
- Lower the Projector Screen with the Control Panel on the Wall
- On the Cisco Interface on the podium, click Room Controls
- Select ON from Project Power
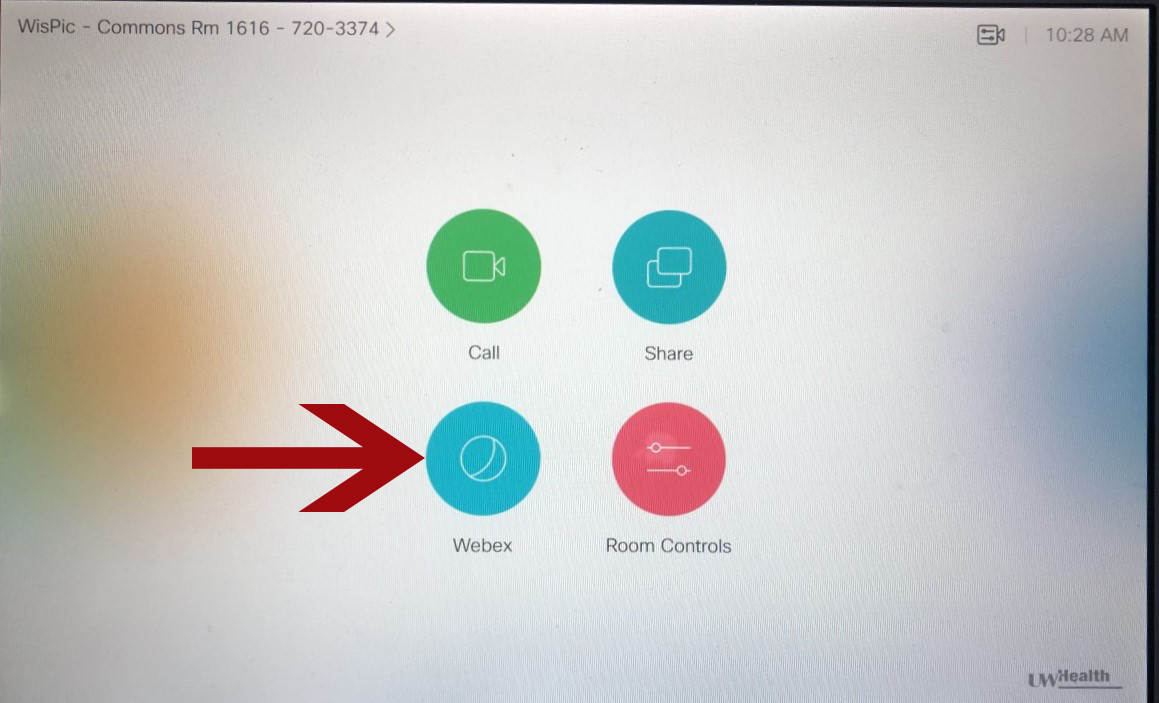
- Navigate back to the home screen, select Webex
- Click on Keypad, then enter your meeting number followed by #
- Power on the Microphone by holding the power button (Please be sure to power it back off when you are finished)
- If you are presenting slides, open them up on your computer and select the Share button on the bottom of the Cisco Webex Application, then select share on the screens tab
- On the Cisco Webex Interface, select the Screen Modification tab on the top right
- Select Single
Your meeting should be set-up, but if you’re having any difficulties feel free to contact the help desk. If you’d like to add video feed of you talking on the podium, read below.
- Select End Call
- Click on Room Controls and select OFF for Projector Power
- Turn off the Microphone
- Use the Control Panel on the wall to put the screen back up